
🎉 Spring Offers Are Here | Up to 50% Off! | Free Shipping Over $49
AOFAR BRAND CUSTOMER SERVICE SUPPORT: service@aofar.com
English manual--------Contact us: service@aofar.com
Manuel en français -------- Contactez-nous: service@aofar.com
Deutsches Handbuch -------- Kontaktieren Sie uns: service@aofar.com
Manuale in italiano -------- Contattaci: service@aofar.com
Manual en español -------- Contáctenos: service@aofar.com
Manual em português -------- Contate-nos: service@aofar.com
Nederlandse handleiding -------- Neem contact met ons op: service@aofar.com
日本語マニュアル -------- お問い合わせ:service@aofar.com
|
1. |
TABLE OF CONTENTS |
3 |
|
2. |
OPERATION INSTRUCTIONS |
4 |
|
|
Measurement range; Focus adjustment; Functions of "MODE" button;
; Range mode; SCAN MODE;
switch function with indicator light |
|
|
|
Slope switch with indicator light;Range mode;Scan mode; |
|
|
|
Flag lock mode;Golf mode example |
|
|
3. |
PRODUCT SPECIFICATIONS |
13 |
|
4. |
DESCRIPTION OF THE SCREEN DISPLAY |
14 |
|
5. |
LIST OF ARTICLES |
15 |
|
6. |
HOW TO WORK AND RANGING ACCURACY |
16 |
|
7. |
COMPONENTS NAME |
17 |
|
8. |
GETTING STARTED (Inserting the battery) |
18 |
|
9. |
USE SAFETY INSTRUCTIONS |
19 |
|
10. 1 |
PRECAUTIONS OF LITHIUM BATTERY |
21 |
|
11. |
MAINTENANCE OF THE INSTRUMENT |
21 |
|
12. |
TROUBLE SHOOTING TABLE |
22 |
|
13. |
CUSTOMER SERVICE/WARRANTY |
23 |
Measurement range
Reflective range: 5~800 Y
Tree range: 5~500 Y
Flag range: 5~150 Y by range mode
5~300 Y by scan mode

Focus adjustment
Rotating the eyepiece until the reticle and object display to your eye clearly.
GX-7N range finder is constructed with an adjustable eyepiece (+/-3 Diopter). People with different visions don’t need to wear glasses, they can observe LCD with naked eyes.
Functions of "MODE" button
【1】Units switch
The GX-7N range finder can be used to measure distances in yard or meter. The unit of measure indicators are located in the lower right portion of the LCD.
To select yard and meter, just press and hold the "MODE" button for 3 seconds to change "Y" (yard) and "M" (meter).
【2】Mode switch
To switch the modes, just short press the "MODE" button to switch the Range mode, Scan mode and flag lock mode.
Slope switch with indicator light
Independent slope switch button

Independent slope switch button
Indicator light
understand the slope on/off status.As shows below.
Light off: SLOPE ON

Range mode

【1】Look at LCD through the eyepiece, you will see the display as below picture.
Tips:Make sure the mode switches to the Range mode,As shows right.
【2】Operation method
After switch to the Range mode,short press Power button again to measure. (The laser rangefinder will auto power-off if no operation within 8 seconds.)
Placing the aiming circle (located in the center of view) on a target over than 5 yards away, press Power button and release quickly.The range,slope compensation distance and angle will be displayed on LCD.
LCD upper data display order: slope compensation distance, angle, slope compensation distance.
(Straight-line distance is 20.82 yards, slope compensation distance is 22 yards,and angle is 4.9 degrees.)
For the parabolic distance of uphill / downhill slope. Please refer to Page 12 "Golf mode example".
Tips: When the target’s background is single or the target is large, just need use RANGE MODE that click the "Power button" to measure; When the target background is complicated or it is difficult to measure the distance by clicking Power button, you can use SCAN MODE.
Scan mode

Mode switching method:
Look at LCD through the eyepiece, then short press the "Mode" button to switch to Scan mode, you will see the display as below picture.
Tip: Make sure that the "Scan" logo is displayed on the left side of the screen, as shown on the right.
Operation method:
Pressing and holding the "POWER" button to moving and measuring your targets."Scan" is always displayed during measurement.
The center circle will flash when moving, and the straight line distance and slope compensation distance will change with the target, and angle won’t be displayed during this time.
The straight line distance,slope compensation distance and angle of the last target will be displayed when the continuous scanning is completed.
Tips:
In this mode, you can scan anywhere, just need to make sure in the measurement range.
In this mode, it can keep on scan with 10 seconds, which is the maximum work time of laser. After 10 seconds, it will shows the last target's datas.
Scan mode/Flag lock mode is recommended when measuring flag on golf courses.
Flag lock mode
1.Flag lock mode (with pulse vibration happen)
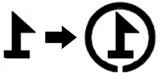
Lock mode sign: After you lock onto flag successfully, the circle on flag sign will shows. (Like image shows)
Method: Pressing "POWER" button and scan from far to flag, at the same time,the circle on the flag will show,you will get distance and feel vibration.
2.Continuous scan after locking successfully
After locking successfully, holding "POWER" button and move to closer targets(above 5 m/6 Y)can active "Continuous scan function". After activating "Continuous scan function", you can only get the closer target's reading.
Notice 1:After activating "Continuous scan function", it can keep on scan with 10 seconds, which is the maximum work time of laser. After 10 seconds, it will stop reading, and LCD will display the last target's data you measured.
Notice 2:To use "Continuous scan function", do not release "POWER" button after locking successfully, you should press and hold "POWER" button to closer targets.
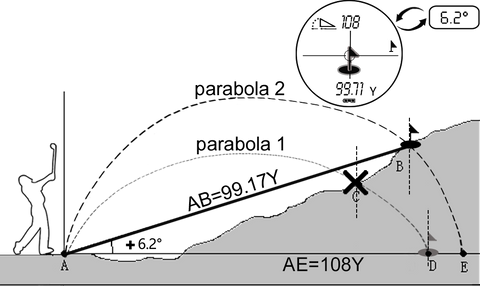
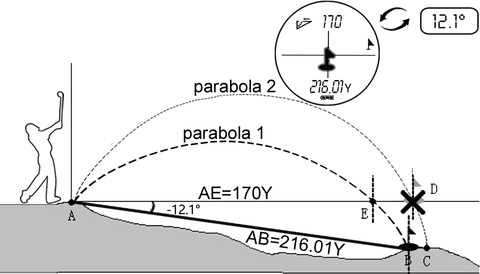
Golf mode example
Distance measurement of ascending slope: Slope is farther than the straight-line distance.
Distance between AB points=distance between AD points in a straight-line 99.71Y.Hit the ball in accordance with the distance measured with the strike parabola 1, the angle of slope is + 6.2 °, and the ball will arrive at the point C. To reach the point B,the trajectory of the ball needs to follow the parabola 2. The actual hitting distance at this time is the straight-line distance between point A and point E, i.e. 108Y.
Distance measurement of downward slope: Slope is less than the straight-line distance.
Distance between AB points = distance between AD points in a straight-line 216.01Y. Hit the ball in accordance with the measured distance with the strike parabola 2, the angle of slope is -12.1 °, the ball will arrive at the point C.To reach the point B,the trajectory of the ball needs to follow the parabola 1. The actual hitting distance at this time is the straight-line distance between point A and point E, i.e. 170Y.
|
Model |
GX-7N |
|
Size |
96*70*34mm |
|
Weight |
180g |
|
Power source |
CR2-3V |
|
Reflective range |
5~800 Y |
|
Tree range |
5~500 Y |
|
Flag range |
5~300 Y |
|
Measurement deviation |
± 1 Y |
|
Magnification |
6 Times |
|
Objective diameter |
24mm |
|
Eyepiece diameter |
16mm |
|
Exit pupil diameter |
4mm mm |
|
Laser wavelength |
905nm |
|
Laser type |
Class I |
|
Diopter |
±3° |
|
Operating temperature |
-10~50℃ |
|
Storage temperature |
-20~60℃ |
|
IP Rating |
IPX4 waterproof |
|
|
|
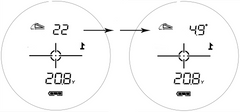
Uphill display: The target is uphill |
|
|
Downhill display: The target is downhill |
|
|
|
Display order: slope, angle then slope |
|
|
|
Scan mode(Continuous scan) |
|
|
|
Lock mode sign :Icon change comparison |
|
|
|
Battery indicator |
|
|
|
Target marker: Please superimpose the center circle with target object to be measured |
|
|
|
Measuring distance: Straight-line distance |
|
|
|
Distance unit display: The distance unit at your option |
 |
|
|
Laser Rangefinder |
Instruction Manual |
|
|
|
|
Handbag, lanyard, cleaning cloth and battery |
|
The GX-7N range finder emits invisible, eye safe, infrared energy pulses. Sophisticated digital technology instantaneously calculates distances by measuring the time, which it takes for each pulse to travel from the rangefinder to the target and back to rangefinder.
The color, surface smoothness, size and sharpness of target will affect its reflectivity and range.
It is difficult to test in the following conditions and environments:
Raining or fogging / Target is too small / Low reflectivity of the measured object (dark color, complex shape, curved surface, water surface, glass surface, mirror surface. etc.) / Low battery.
|
Display |
Description |
|
|
Sufficient power available |
|
|
60%power left. |
|
|
Low battery indicator flash: Replace the battery now! *It can be turned on, but it can’t shows any data. Meanwhile, vibration will be paused. |
Note: It is recommended that the battery should be replaced once every 12 months.
Notice: Replace the battery when Low battery indicator shows.
If the "  " displays and flash on LCD, which means "low battery". It can be turned on, but it can’t shows any data. Meanwhile, vibration will be paused.
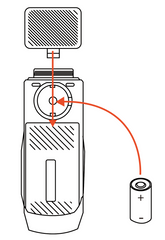
Install/Replacing battery
Warning!
Attention!
※Please don't preserve or place the lens under the sun!
It's radiation convergence function can harm the LCD

Do not disassemble and modify the product by yourself.
Do not throw it into fire or store it in high temperature.
Avoid direct contact with metal objects such as coins or keys (in a pocket or bag).
Observe treatment methods in your native policy when dropping a used lithium battery.
Gently wipe the surface of lens with a clean, soft cloth to remove stains which would damage it.
If there are stains on the surface of the lens, which may damage lens. Do not touch the lens with your finger to protect the coating from the appearance.
If LCD can’t be turned on:
If Distance measurement is abnormal:
It can be turned on, but the data will not be displayed:
Measurement error:
Battery power runs out quickly:
Customer service:
Website : www.aofar.com
Customer service: service@aofar.com
Facebook: Aofar Us
AOFAR focuses on the research and development of outdoor products especially in range finder and compass, AOFAR has first-class production technology and R&D experts.Nowadays, our products are sold all over the world and very popular. We dedicate to improve customers' outdoor life by rich experience and expertise.
Warranty
The product warranty period is two years from the date of purchase.
Our customer service will reply you within 24 hours after receiving your message.