
AOFAR BRAND CUSTOMER SERVICE SUPPORT: service@aofar.com
English manual--------Contact us: service@aofar.com
Manuel en français -------- Contactez-nous: service@aofar.com
Deutsches Handbuch -------- Kontaktieren Sie uns: service@aofar.com
Manuale in italiano -------- Contattaci: service@aofar.com
Manual en español -------- Contáctenos: service@aofar.com
Manual em português -------- Contate-nos: service@aofar.com
Nederlandse handleiding -------- Neem contact met ons op: service@aofar.com
日本語マニュアル -------- お問い合わせ:service@aofar.com
1.TABLE OF CONTENTS
|
1.
|
TABLE OF CONTENTS
|
3
|
|
2.
|
OPERATION INSTRUCTIONS
|
4
|
|
|
Focus adjustment;Modes Memory Function;Functions of "MODE" button;Range mode; Speed mode; Scan mode
|
|
|
3.
|
PRODUCT SPECIFICATIONS
|
9
|
|
4.
|
DESCRIPTION OF THE SCREEN DISPLAY
|
10
|
|
5.
|
LIST OF ARTICLES
|
11
|
|
6.
|
HOW TO WORK AND RANGING ACCURACY
|
12
|
|
7.
|
COMPONENTS NAME
|
13
|
|
8.
|
GETTING STARTED (Inserting the battery)
|
14
|
|
9.
|
USE SAFETY INSTRUCTIONS
|
15
|
|
10. 1
|
PRECAUTIONS OF LITHIUM BATTERY
|
17
|
|
11.
|
MAINTENANCE OF THE INSTRUMENT
|
17
|
|
12.
|
TROUBLE SHOOTING TABLE
|
18
|
|
13.
|
CUSTOMER SERVICE/WARRANTY
|
19
|
2.OPERATION INSTRUCTIONS
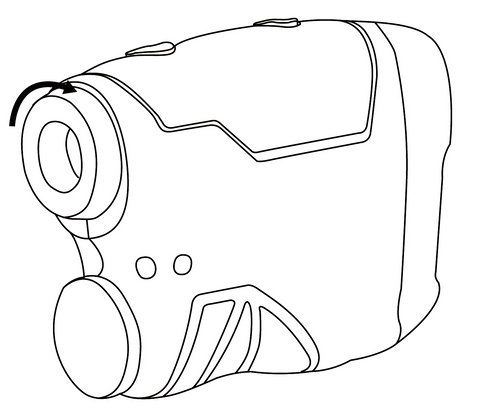
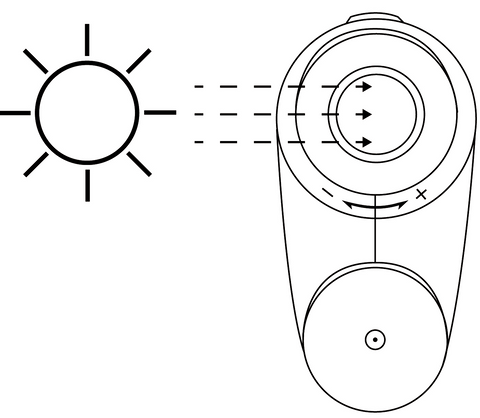
Focus adjustment
HX-800I range finder is constructed with an adjustable eyepiece (+/-3 Diopter). People with different visions don’t need to wear glasses, they can observe LCD with naked eyes.
Rotating the eyepiece until the reticle and object display to your eye clearly.
Modes Memory Function:
The initial boot mode is RANGE mode. But any of your operations will lasts to next turn on after shut down.
Functions of "MODE" button
【1】Units switch
The HX-800I range finder can be used to measure distances in yard or meter. The unit of measure indicators are located in the lower right portion of the LCD.
To select yard and meter, just press and hold the “MODE” button for 3 seconds to change “Y” (yard) and “M” (meter).
【2】Mode switch
To switch the mode, just single-point the "MODE" button to switch the Range mode, Speed mode and Scan mode.
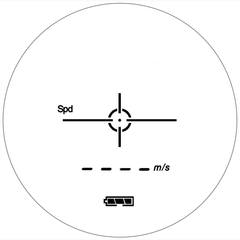
Range mode
【1】Look at LCD through the eyepiece, you will see the display as below picture.
Tips:Make sure the mode switches to the Range mode, as shown in the figure below.
【2】Operation method
After switch to the Range mode,pressing Power button again to measure. (The laser rangefinder will auto power-off if no operation within 8 seconds.)
Placing the aiming circle (located in the center of view) on a target over than 5 yards away, press Power button and release quickly.The Straight-line between you and your target will be displayed on LCD.

Speed mode
【1】Look at LCD through the eyepiece, then single-click the "Mode" button to switch to Speed mode, you will see the display as below picture.
Tips: Make sure that the "Spd" logo is displayed on the left side of the screen, as shown in the figure below.
【2】Operation method
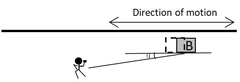
Single-click the"POWER"button to aim at target B and move slightly,the speed of the movement can be measured accordingly, “spd” is always displayed during measurement.
Notice:
Aiming circle should be aligned on target until aiming circle stops flash, meantime gets target’s speed.
“α”must be less than 10°, the smaller the angle, the higher the accuracy of speed.
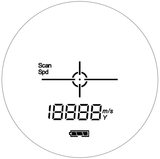
Scan mode(Continuous scan)
【1】Look at LCD through the eyepiece, then single-click the "Mode" button to switch to Scan mode, you will see the display as below picture.
Tip: Make sure that the "Scan" logo is displayed on the left side of the screen, as shown in the figure below.
【2】Operation method
Continuous Scan:Long press the "POWER" button and keep moving to measure distance.
The center circle will flash when moving, and the last target’s distance will be displayed when continuous scan is completed.
Tips: When measuring targets in bad hunting weather, it is recommended to use the scan mode.

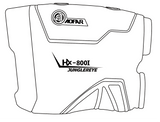
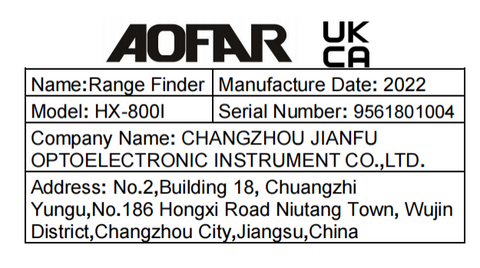
3.PRODUCT SPECIFICATIONS
|
1.
|
Model
|
HX-800I
|
|
2.
|
Size
|
10.5*7.5*2.5 cm
|
|
2.
|
Weight
|
135g
|
|
3.
|
Battery
|
CR2-V
|
|
4.
|
Measurement range
|
5 ~ 800Y
|
|
5.
|
Measurement error
|
± 1 Y
|
|
6.
|
Measuring range of speed
|
0.5-100m/s
|
|
7.
|
Magnification
|
6 Times
|
|
8.
|
Objective diameter
|
20mm
|
|
9.
|
Eyepiece diameter
|
14mm
|
|
10.
|
Exit pupil diameter
|
3.3mm
|
|
11.
|
Laser wavelength
|
905nm
|
|
12.
|
Laser type
|
Class I
|
|
13.
|
Diopter
|
±3°
|
|
14.
|
Operating temperature
|
-10~50℃
|
|
15.
|
Storage temperature
|
-20~60℃
|
|
16.
|
IP Rating
|
IPX4 waterproof
|
4.DESCRIPTION OF THE SCREEN DISPLAY
 |

|
Battery indicator
|
|

|
Continuous scan
|
|

|
Speed of your target
|
|

|
Target marker: Please superimpose the center circle with target object to be measured
|
|

|
Measuring distance: Straight-line distance
|
|

|
Distance unit display: The distance unit at your option
|
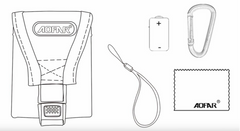
5.LIST OF ARTICLES
 |

|
|
Laser Rangefinder
|
Instruction Manual
|
|
|
|
Handbag, lanyard, cleaning cloth, battery and carabiner
|
6.HOW TO WORK AND RANGING ACCURACY
The HX-800I range finder emits invisible, eye safe, infrared energy pulses. Sophisticated digital technology instantaneously calculates distances by measuring the time, which it takes for each pulse to travel from the rangefinder to the target and back to rangefinder.
The color, surface smoothness, size and sharpness of target will affect its reflectivity and range.
It is difficult to test in the following conditions and environments:
Raining or fogging / the target is too small / Low reflectivity of the measured object (black color, complex shape, curved surface, water surface, glass surface, mirror surface. etc.) / Low battery.
7.COMPONENTS NAME

- Objective lens
- Laser Transmitting Objective Lens
- Laser Receiving Objective Lens
- Units Switching Button(m:Meter/Y:Yard)/ Mode Switch Button
- Power/Reading Button
- Rotary Focusing
- Battery Cap
- Observing Eye lens/LCD (Liquid crystal display)
- Sling Connecting Hole
8.GETTING STARTED (Inserting the battery)
|
Display
|
Description
|
|

|
Sufficient power available
|
|

|
60%power left.
|
|

|
Power getting low. Please replace the battery.
|
Remove the battery cap by rotating the cap counter-clockwise.
-
Insert a CR2-3V battery.
-
Put the negative pole of lithium battery into battery compartment first.
-
Replace the battery cap.
Note: It is recommended that the battery should be replaced once every 12 months.
Low battery indicator: If the “  ” displays in view of LCD, which means “low battery”. The 3-volt lithium battery should be replaced.
Install/Change battery
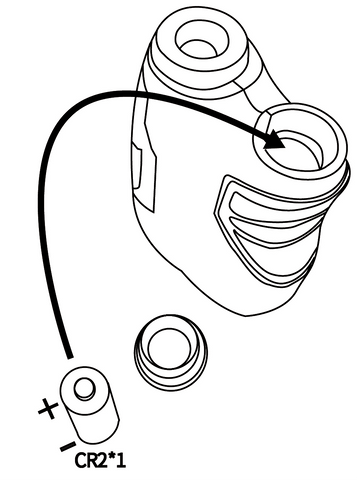
- Open the cap counter-clockwise
- The positive pole "+"of the lithiumbattery CR2 should be placed outwards. (look atthe picture)
- Tighteningthe battery cap clockwise after installing the battery.
9. USE SAFETY INSTRUCTIONS
-
Preventing your instrument from falling or getting damaged and never tamper it. If there is abnormal noise, please contact customer service department of our company.
-
The operating temperature for this product is-10 ℃~50 ℃. Please use or keep the instrument within the operating temperature range and avoid using in a sharp temperature change environment.
-
Please do not keep the product under the sunlight directly, high temperature or low temperature environment for a long time. (g.in trunk of car).
-
Do not expose and aim at the sunlight.
-
Do not use or store the product in the environment with strong electromagnetic radiation or magnetic field.
-
If the product isn’t be in use for a long time, please remove the battery and store it in a cool, dry place. It is also recommended to put this product in a dry box.
-
Do not disassemble, modify or repair the product by yourself, the damage of the instrument and the irradiation of the laser may cause the visual damage and other harm.
-
Please do not use it in dusty areas in order to avoid failures.
-
Although the product has waterproof function, please do not get it wet or immersed in water intentionally. When there is moisture around the button, please operate it after wiping it off, and do not use it in water.
-
Please confirm that the battery cover is closed tight when it be used.
Warning!
-
Do not look at the Laser Transmitting Objective Lens2 .
-
Do not measure eyes of others.
-
It is forbidden to detach this product yourself.
-
It should be kept out of reach of the children.
Attention!
-
It is normal for lens to be wet when the temperature changes suddenly. In this situation, remove the battery and do not use the device until it becomes dry.
-
Moving from a cold place to a hot room of the product may dew on the appearance and internal parts. To avoid this phenomenon, please put the device in a waterproof plastic bag and take it out after its temperature has gradually increased.
-
To avoid failures, donot store the product in:
- Unventilated and humid places
- The car or trunk exposed to the sun
- Environment with humidity over 90%
※Please don't preserve or place the lens under the sun!
Its radiation convergence function can harm the LCD
10.PRECAUTIONS OF LITHIUM BATTERY
-
To prevent leakage, heat and fire, etc.
Do not disassemble and modify the product by yourself.
Do not throw it into fire or store it in high temperature.
Avoid direct contact with metal objects such as coins or keys (in a pocket or bag).
-
If skin touch the leaked liquid accidentally, please rinse under cool water immediately. If eyes or mouth touch liquid leaking, do not rub. Rinse under cool water and consult a doctor.
-
It must be kept out of reach of children.
Observe treatment methods in your native policy when dropping a used lithium battery.
11.MAINTENANCE OF THE INSTRUMENT
Gently wipe the surface of lens with a clean, soft cloth to remove stains which would damage it.
If there are stains on the surface of the lens, which may damage lens. Do not touch the lens with your finger to protect the coating from the appearance.
12. TROUBLE SHOOTING TABLE
If LCD can’t be turned on:
-
Pressing Power button again.
-
Check battery or replace it if necessary.(Determine if there is an insulator blocking the battery power)
If Distance measurement is abnormal:
-
Please confirm whether the lens have dirt.
-
Please make sure that the mark circle overlap your target.
It can be turned on, but the data will not be displayed:
-
Low battery voltage,please change the battery.
-
Out of measurement rangeor less than 5 yards.
-
Change the measurement target.
Measurement error:
-
M/Y is not switched.
-
Rain and fog and small target will also affect the measurement results.
Battery power runs out quickly:
-
Low ambient temperature will cause the battery power runs out quickly.
-
If the battery has not been used for a long time after unpacked, the battery power will run out quickly.
13.CUSTOMER SERVICE/WARRANTY
Customer service:
Website : www.aofar.com
Customer service: service@aofar.com
Facebook: Aofar Us
AOFAR focuses on the research and development of outdoor products especially in range finder and compass, AOFAR has first-class production technology and R&D experts.Nowadays, our products are sold all over the world and very popular. We dedicate to improve customers' outdoor life by rich experience and expertise.
Warranty
The product warranty period is two years from the date of purchase.
-
Please take a few minutes to register your product at aofar.com/account/register
-
In the event of a need for service or repair, please contact AOFAR Product Service at: service@aofar.com
-
For product questions, consult the AOFAR Website at: aofar.comor contact Customer service:service@aofar.com
Our customer service will reply you within 24 hours after receiving your message.
 Automatic Discount: 30% OFF SPECIAL PRODUCT ORDER